Use Wallpaper As Wallpaper

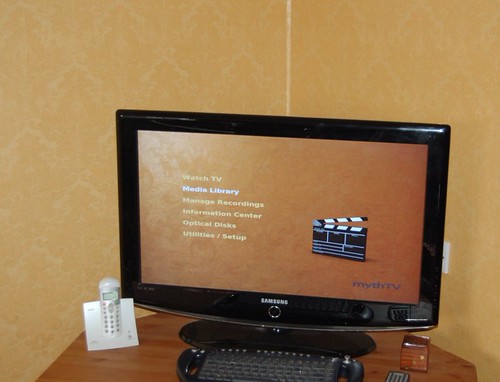
Here’s an idea for you, why not use your wallpaper as wallpaper? Here’s a picture of my TV attached to my MythTV PVR. The background image is a photograph of the wallpaper immediately to the left of TV. It just makes the TV “fit” into the room better (in my opinion).

Wallpaper as wallpaper

You could do this for any computer screen that sits in front of a wall.

In this case I updated a MythTV theme to use the picture as the background.

To do this locate your themes folder. Mine is at /usr/share/mythtv/themes/ and then copy the folder of the theme you want to base it on. Have a look for the theme.xml file and open this with gedit (or your text editor of choice). You’ll see a section that describes the background – note the name of the file and the directory it is in. Now go and open that file and take a note of the image size.

All you have to do is rescale your photograph of your wallpaper, and then replace the theme background image with it. Select your new theme from within MythTV and you’re done.

Soundchecks and how to survive them

Six String Bliss Logo
There has been a great thread over on the Six String Bliss forum about how to get the best out of a soundcheck. With permission, I’ve summarised the main points below. But if you are interested in this subject I urge you to go and read the original thread.

  1. As the boy scouts say “Be Prepared” make sure you load up your van with what you need. Make a simple list of all the bands, or your own, equipment, and write on each case what’s in there
  2. If some piece of equipment is problematic or having issues then treat it as broken! Get it fixed or repaired, or replaced or borrow something. Nothing is more annoying than the guitarists amp crackling and banging when he hits his boost pedal because there is a short inside it hes been aware of for months.
  3. If you are a support for a bigger band then make sure you get an exact time for your soundcheck, then also ask what time you have access to the venue. If you have soundcheck at 3:00pm then that means you start loading your assembled (see next note) rig onstage.. not turning up to the venue at 3:00 and unloading your car and finishing your coffee/lunch and finding a park and wasting time.
  4. Get there early and assemble everything. That doesn’t mean plug it in and make a racket while the main act is trying to tune their vocal mics or eq the room. Find an area side of stage and unpack and prepare your gear. If you’re big enough to have a tech then find them a space to set up your “guitar world and kit” get your guitars out and tuned, if you have time restring, but not if it means eating into your soundcheck time. Get your pedals sorted and cables untangled. If you need to do any last minute battery changes or plug in power cables get ready.
  5. When you get your “call” to set up or “change over” be as efficient and as tidy and as “RESPECTFUL” as possible. Remember on the bigger shows some of the crew there will have been there from early in the morning and will be stuck there till very late that night and the last thing they need or want is some band practising “Welcome to the jungle” riffs while they’re trying to put mics in front of your cab.
  6. Get set up and plugged in and ready to make a noise. At this point if no one is working in front of your cab/amp then you can make sure its all going. This doesn’t mean endlessly doodle and fark round. There will be each member of the band wanting to do the same thing and that noise can be quite off putting to people who are trying to save their ears to mix your band so you sound the best you can be.
  7. Soundchecks are NOT rehearsals. You shouldn’t be really writing or rehearsing songs during your soundcheck. This time is set aside for the Front Of House (FOH) engineer and Monitor engineer to get your levels right and the placement of everyone in the mix. They don’t want to hear you all debate which chord the song should end on.
  8. A sound check will normally follow a few simple rules. There may be a line check which is where the FOH makes sure all the corresponding mic’s and lines are all matched to his desk layout before they start asking for individual instruments.
  9. The soundcheck begins… whether you’re using a house engineer, the main band’s engineer, or an engineer you hire they will want to go through each instrument as it is layed out on their sound desk.
    So this will nearly always begin with kick drum, snare, rack tom 1, rack tom 2 and so on then the cymbals and overheads. Then it is normally the bass – both DI and mic if applicable. Then the guitars, keys or whatever instruments ending up with the vocals.

  10. Drum sound checks are TEDIOUS. Having to listen to a drummer hit the kick drum or snare or as the case usually is rack toms over and over and over…… and over…… and over whilst the FOh eq’s out any over rings or bad frequencies is boring and hard on the ears. If you have ear plugs put them in. Normally the FOH will check each guitar individually, for your clean sounds and your overdrive sounds, to make sure the volume difference isn’t too major. The last thing you want is for a solo to come in so loud it blows the ears out of everyone in the crowd, making the FOH guy pull the fader down and curse at you under his breath. Also your pedal may be too low and need turning up to get across the band. Its usual to need both guitarists to play together for a bit on their own so they can get the balance of each guitar and see if either needs to turn down on stage. During this time pick an easy piece of music you can play over and over and keep repeating… and keep on playing till they ask you to stop. Believe me, the FOH guys are working as fast as they can and not wanting to drag a soundcheck out any longer than need be.
  11. When its time to play thru a song, pick a song that has everyone playing most of the time.. A 15 minute epic conceptual piece where the singer warbles and the drummer plays one note on the floor tom doesn’t help the soundcheck for anyone. Pick a song that has everyone playing and something that covers the hard and soft elements of the bands sound. The FOH engineer needs to hear you at your softest and your loudest. Giving them a setlist with notes pertaining to a heavy number or a long mellow start will help them mix off the cuff and add any effects that may make the song sparkle..
  12. Sorry but the FOH engineer is nearly always right. If they ask you to turn down, it is in the bands best interest and the best interest for the mix. The PA is there to put out a perfect mix of the band so everyone in the venue has a great sounding show. If you’re playing your bass or guitar so loud on stage then the engineer will just be pushing the Vocals thru the PA trying to get over the top of the noise of guitars and thats a terrible sounding mix. It is better to turn down and give your engineer the chance to do his job to the best and MIX the band. and make sure it all comes across clear and defined. I don’t care how loud you practise in your bedroom or practise room, a proper stage volume is not as loud as you think it should be. And sorry, but alot of those big super rock and metal acts with walls of guitar cabs on stage – never plug them in. Yes there are the exception that do, but most of the time they are dummy cabs or just not plugged in and the amp is in the guitar techs work area where he can keep an eye on it and there is a cab behind the wall of speakers or in an isolation chamber so the FOH engineer can get a clear guitar channel without every other instrument blaring through it.
  13. If you have to take your gear off between soundcheck and playing time, say if there is another band to check, then “spike” your gear out. This means take some clearly visible tape like colored gaffer tape and mark out the corners of your pedal board and amp. It is even worth putting some tape on your amp and mark down your settings after soundcheck so in moving nothing gets knocked. Even a few notches can be mega-drastic when you put that through a 20,000 watt PA!
  14. MONITORS! if your lucky enough have a monitor engineer side of stage or maybe the FOH guy/gal is doing monitors then usually after you’ve gone through a song or just before they will ask any specific requirements for each member if they have there own Monitor or “wedge” some smaller venues may only have “two sends” which means you can get two different mixes – usually one for the drummer and one for the front of the stage for the singer and guitarists to share. Getting a good monitor mix is as important as the FOH mix – if you cant hear yourself or the singer or the beat then the band WILL fall apart!
  15. Once you’ve done your soundcheck, if you have to clear the stage, then make sure thats what you do, get all your stuff off. I have seen stage managers from bands throw support bands gear into bins when they leave stuff behind.
  16. Every band playing at any professional or semi-professional level should have an accurate and most importantly UP TO DATE “Stage Plot”. This is a diagram that shows, from above, each instrument, amp and drumkit position and also placement of mic stands and monitors. You can also include an input list, though this is something that a good sound engineer is best to type up for you as its designed to give other engineers and stage hands an idea what you’d like on your Quad box and combo amp, or if you’d like your bass cab mic’d up as well as DI’d. The stage plot helps any stage hands that have to load on your gear and makes sure a particular guitar amp is on a particular side. Even a badly drawn stage plot is better than none.

    Thanks to “gunsforhire” and “laughinglarry” for sharing their vast experience, as well as all of the other forum contributors.

Bcc yourself for follow up

I frequently used to find that I would email someone and would either need a response from them, or would need them to do something as a result of the email. Unless I remembered to keep a separate note, to check that it had been dealt with, I would frequently forget until weeks later I’d have one of those “I wonder what happened to…” moments.

To tackle this problem I set up a folder called “Follow up” and then created a filter/rule that scans all incoming email. If the sender is me, and the Bcc is me too, it marks it as read, and moves it to “Follow up”.

Then, whenever I’m sending an email that requires a response or an action, I simply add myself as a Bcc and it finds it way to my “Follow up” folder. I regularly scan through the folder (usually Friday afternoon), archive the completed items and chase the overdue (or soon to be due) ones.

NB: I know that some email clients (Outlook, Lotus Notes, etc) have a built-in follow-up capability, but I have only found this to work in an environment where everyone is using the same client/infrastructure. I don’t work in that type of environment, and, as a freelancer, I don’t always get a choice of what I use. I have found this approach is generic enough to work on everything.

Benford Custom Telecaster first impressions

The Benford Custom finally arrived. It was a couple of days later than expected, thanks to a customs delay, but it is here now.

Initial impressions are that the quality of the finish is just massively beyond anything I had expected. The frets and fretboard, close up, really are a thing of beauty. Sustain is amazing and it has a chimey, bell like tone unplugged and plugged.

It is the tiny details that really stand out when you’ve got it in your hands:

  • The black headstock logo on black ebony. Understated beauty.
  • The way the body is shaped to accept the neck is just sublime.
  • The silky smooth feel of the neck combined with a profile that feels both substantial and slim at the time time. I cannot work out how Steve has done this. Something close to alchemy I reckon. Hands down the best guitar neck I have EVER played.

I could write reams about this thing, and no doubt will eventually, but you’ll have to excuse me. There’s a guitar here that needs playing.

Tools and materials used to build a valve amp

One of the key reasons for the success of my amp build was the preparation I put in beforehand. Most important part of this was spending a few days reading and re-reading the build instructions and, whilst I read through, making a list of all the tools and materials I thought I might need. With the benefit of hindsight, this is what I learnt.

Mandatory – Don’t start the build if you don’t have these

  • Soldering iron.
  • Solder.
  • Frame or supports to allow the amp chassis to hang upside down with clearance for the valves and transformers. I used a couple of large heavy storage jars.
  • Pliers and needle-nose pliers.
  • Wire cutters.
  • A sharp knife.
  • Screwdrivers (small and medium, flat head and Phillips).
  • Junior hacksaw (or Dremel), for trimming the potentiometer shafts.
  • Multimeter. Mine is a very simple budget meter that measures DC, AC and resistance (which is the setting I also used for continuity checks). It can also measure current but this setting wasn’t required.
  • The printed build guide in colour.
  • A pen.
  • Ruler or tape measure, for cutting the various wires to the specified length.

Recommended – You could manage without, but I wouldn’t recommend it

  • Assorted spanners or sockets (various sizes from 7mm to 13mm).
  • Tweezers, because you will drop a fiddly piece into the chassis at some point.
  • A soldering iron stand.
  • A “helping hand”, a stand with a couple of clips on that allows you to quickly and lightly clamp smallish items, because you need one hand for the soldering iron and one for the solder.
  • Camera, was very useful for keeping track of what I’d done. When it comes to making the modifications I can sketch and plan them out on a picture, rather than having to take the amp out of the enclosure.
  • Insulation stripping tool – You can do this with the sharp knife or your teeth, but there are a lot of wires to be stripping and, when you’re prepping them in a tight location (cutting to length and stripping the insulation) particularly with a shorter run of wire, this was an invaluable tool to have.
  • Highlighter pen, to mark off the tasks that you have done. I only did this once I’d tested that the task had been completed successfully. This makes it very easy to make sure you don’t miss any step.
  • Masking tape, or some other way of labelling items whilst you’re building. Make sure it is something that peels off easily.
  • Extra cable ties (aka tie wraps). You get four in the kit but I elected to add a few more to keep the cable runs a bit neater.
  • Worklight. Unless you’ve got a really well lit work area, you need to make sure you’ve got a light that you can position as you need, particularly when you’re working in the corners of the chassis.
  • Magnifying glass, because the markings on some of the small capacitors are minuscule.

Not used – The stuff I got out “just in case”

  • Drill and bit – I was planning to drill the holes in preparation for the later addition of a Variable Voltage Regulator (VVR) kit, but the supplier didn’t get back to me with details of the size of hole needed, so this was postponed for another day. Thankfully I’ve got pictures of the inside of the chassis (see above) so I can plan this out on paper without having to take apart the amp.
  • Blutack – I was planning to stick the components onto a scale picture of the turret board to simplify the organisation, but the simple step of taping and labelling each item did away with the need for this.

Tools

Building my amp kit step-by-step

So the day has finally arrived… time to build me a valve guitar amplifier. I’d bought a combo cabinet from Chris (see earlier posts) and the kit had arrived from Ampmaker. Now I’m not lucky enough to have a workshop so it was going to be happening on the dining room table. Since dinner was due to be at 19:00 I had a deadline ahead. After a quick coffee and breakfast I got cracking at 09:30.

Kit

Here’s the kit. It was packed better than this. I removed most of the bubble wrap during the initial check.

Step 1 – Check the contents

I went through every single component and checked it against the kit contents list. This included using a multimeter to test the value of all the resistors. There was one omission (more of which later).

Step 2 – Gather all the tools and materials and prepare the work area

I’d previously made a list of all the tools I’d need for this job. So I wandered round the various rooms in the house and sheds gathering everything together and then prepared and laid out the work area.

Tools

Step 3 – Fitting parts to chassis

Not much to say other than I followed the instructions and fitted all the parts to the chassis, trimmed the volume pot posts and screwed on the chicken-head knobs. If I was doing this again, I’d trim the pot posts before mounting them into the chassis.

Chassis

Chassis

Chassis

Step 4 – Label all components

This was an additional step that was recommended by a friend, Ian Chadwick, who is also working on an Ampmaker kit. I stuck a piece of masking tape on to each component and wrote the value, and reference number (relating back to the instructions) and laid them out in order. It was amazing the difference this step made to the build. I was able to build up a really nice rhythm when soldering instead of having to go rooting around for each piece when I needed it.

Labelled components

Step 5 – Mount components

Working left to right across the turret board I would dry mount each section, check the measurements, trim the component leads and then solder them in place. After each small section I would go back across and use the multimeter to test every solder joint.

Turret board

Turret board

Step 6 – Wire up board

Kept following Ian’s advice and labeled each of the 21 turret board wires with where it was going to (i.e. VR2-3 meaning 3rd lug of variable resistor 2). Now if labeling the components had simplified the mounting on the turret board, with the wiring it was absolutely vital because when mounted into the chassis you can’t see exactly where the wire comes from (they’re soldered to the underside).

Wired board

Step 7 – Chassis mounts

The items missing from the kit were the spacers to hold the turret board away from the chassis when it is mounted. This point neatly coincided with lunch so I grabbed a quick sandwich and headed off for B&Q. I bought six M3x25mm machine screws and twelve extra M3 nuts for them and improvised the following;

Mounting

Step 8 – Wiring it all up

This was probably the most time consuming aspect of the build. You mount the chassis into the kit and then slowly an methodically work your way through the detailed steps outlined in the kit instructions. Once the turret board is mounted, it can get a little tight getting in to solder in some areas of the chassis, such as the earth lug, near the input socket. But I took my time and aside from a couple of unfortunate soldering iron/finger interfaces I emerged relatively unscathed.

Valve sockets

Wired and done

Step 9 – Testing

There are four main stages of testing the amp. Firstly working across the chassis testing some of the key safety items, such as making sure all of the relevant parts are connected to earth. Secondly is to power it up without the valves and check some key voltages across the amp, and then again with the valves installed. The last step was the scariest and best bit – plugging in a guitar and speaker and hearing the first noise come out. Oh yes – my baby worked first time!

Step 10 – Mount in enclosure

The amp neatly mounted into the cab supplied by Chris and I tidied up the speaker wiring. The original messy cabling had been put in quickly to test the speakers after buying them on eBay and needed stripping out and redoing.

Speaker wiring

Step 11 – Crack out the Telecaster and play!

Finished amp

Lessons learned

  • Labeling all of the parts before starting seemed a bit anal, but saved so much time and confusion and, at the point where you’ve got a soldering iron in hand, just allows to to concentrate on what you’re doing.
  • Test after EVERY step and don’t move on until it works.
  • Take the time to work methodically.
  • Get a highlighter pen and work through the instructions word by word and mark it through only when you’ve tested that the step has been finished.
  • I almost got the polarity wrong when soldering in a couple of the capacitors. It would have been better if I had used the highlighter pen to mark all of the components where polarity mattered (some capacitors and both of the diodes).

Initial impressions

  • Great dynamics and very responsive to the volume of guitar.
  • The sound has lovely character and warmth and yet, especially with the Telecaster, you can get a superb razor sharp clean tone.
  • Breaks up very controllably and still keeps definition in each note even with the gain wound up to 10.
  • Usable tone controls right through their range. On most amps I’ve ever owned, if you get to any of the extremes of the treble, mid, bass, it sounds awful and the “sweet” spot is very narrow. With the SE-5A, the tone controls give very usable sounds at every extreme.

When I get my music room back I’ll record and post some sound samples. In the meantime my (long-suffering) wife seems to be under the misapprehension that it is a guest room for our current visitor.

And before you ask, yes the table was set for dinner at 7:00pm, but only just! All in, excluding tea breaks, lunch and the trip to B&Q, it took about 8.5 hours.
DIY build of amp, speaker or combo enclosure?

I’ve now had a few days with my new combo enclosure and, even without the amp itself installed, I’ve been using it with my little half watt Smokey amp and it is fantastic.

You can see examples of Chris Uff’s work, along with sizes, available finishes and costs at www.ampmaker.com and you can contact Chris directly at chris[at]c-and-l[dot]freeserve[dot]co[dot]uk

The quality of Chris Uff’s work is exceptional and this shows in the small details;

  • The way that the speaker mounting hardware lines up *exactly* with the holes in the speaker – and this is despite Chris not having access to the actual speakers.
  • The finishing of the tolex round the small tricky corners.
  • Most impressive of all is the neatness of the inside of the cabinet – even the hidden areas have been finished with care and attention to detail. Surely this must be the mark of a true craftsman.

I dithered for weeks over whether to commission Chris to build one or to do it myself. In the end the decision came down to a combination of the cost and the time it would take. I’d worked out that the materials to build the combo would cost me in the region of £90 to £100. The design I’d come up with was similar to Chris’, although was a little shorter and deeper. Add on to that the cost of tool hire for a table saw and the 20-30 hours it would take to build it and it looked like it was fairly evenly balanced between this and the £190 for a finished enclosure from Chris.

If I had then understood the quality difference between Chris’ work and the result I would have come up with, it would have been a very easy decision. I had planned to use butted joints, screwed and glued with battens, whereas Chris’ construction is finger jointed, which is neater, less reliant on the batten and structurally much stronger. There is no way, without a lot of practice and wasted tolex, that I could have covered the amp as neatly. I know from experience of similar projects before that I’d just be getting the hang of it as I was finishing the last piece. The flaws in the covering would have bugged me forever – but never quite enough to the point where I’d strip it off and start again. It would just sit there irritating me.

If you’re considering building your own amp, speaker cabinet or combo enclosure then, unless you have easy access to a good table saw and router, a cheap source of birch ply, and are confident in your finishing skills, I would heartily recommend that you drop Chris a line. Of course, depending on how you rate your skill and how much you value your own time, your mileage may vary.

I do realise that there is the pleasure and pride of “I built that” which I’ve not mentioned but, in my case, it was more than cancelled out by the potential annoyance of the flaws caused by my lack of skill.

DIY Valve Amp – Kit ordered

The Ampmaker website is back up and my order went through very smoothly, even doing it on an iPhone over 3G. Great testament to the work done by Barry.

I’ve started detailed planning for the build and am writing a list of all the tools and materials I need to gather before starting, as well as creating myself a checklist covering all of the build. This includes some additional steps I want to take along the way – such as taking photographs at key stages; so I can remember what I’ve done but also so I can clearly document the steps I went through. Primarily it is for the wholly selfish reason of making sure my build goes smoothly and I force myself to check, test and double check every step along the way. Of course it will leave behind a guide that may prove useful for other builders, as well as a reference for my next build. I can already feel in my water that this isn’t going to be the first valve amp I build for myself.

I think I’ve tracked down the answer to the problem of being able to wind the amp up but to still keep it at a reasonable volume for late night use. Barry recommended I investigate the VVR3, a Variable Voltage Regulator from Hall Amplification. I’m not going to build it in to the amp from day one, but will ensure that I drill the relevant holes in the chassis and panel before I start, so that it will be easier to retrofit once I’ve got the “vanilla” build up and running. I’m waiting back from a response from Hall regarding the best place to locate the control, so that I can minimise any risk of noise from the additonal wiring and components and yet still ensure the control is accessible and in a logical place.

Hopefully the amp kit will be arriving this week, so that I can get cracking at the weekend. If not, I’ve got all the stuff now to do the brass name plate so I’ll have plenty to keep me busy.